

昨天在自己的 Laravel5.5 框架项目中,希望集成 Layer 的图片上传功能 但是在 ajax(POST) 提交请求时,一直显示 500 报错
⒈ 问题所在

最后将核心代码摘出,放到 Larvel 框架以外运行,发现代码是没有问题的,因为对 Laravel 框架接触的太浅,忽视了 CSRF 的限制
⒉ 解决方案
一般在表单提交时,都会存放一个隐藏的输入框
<input type="hidden" name="_token" value="<?php echo csrf_token(); ?>">或者在需要提交的表单中补充一行代码:
<form method="POST" action="/profile"> {{ csrf_field() }} ...</form>
但是,在比较单一的元素进行 ajax 提交时,建议可使用如下的方法
①. 页面中添加隐藏域
<input type="hidden" name="_token" class="tag_token" value="<?php echo csrf_token(); ?>">②. ajax 请求前,先获取 csrf_token() 值
var tag_token = $(".tag_token").val();
③. ajax 请求时,将该值作为数据的一部分传输过去,例如:
data:{'_token':tag_token}
♫ 实现步骤
⒈ 源文件目录
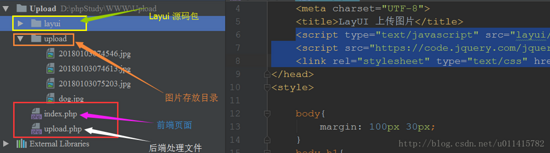
⒉ 前端准备
页面引入layui 的 css 和 js 文件
<script type="text/javascript" src="layui/layui.js"></script><script src="https://code.jquery.com/jquery-3.2.1.min.js"></script><link rel="stylesheet" type="text/css" href="layui/css/layui.css" rel="external nofollow" />
注: 本人下载的 layui 框架源码包为 layui-v2.2.45
核心代码:
<div class="layui-form-item"> <div class="layui-upload"> <button type="button" name="img_upload" class="layui-btn btn_upload_img"> <i class="layui-icon"></i>上传图片 </button> <img class="layui-upload-img img-upload-view" src="upload/dog.jpg"> <p id="demoText"></p> </div> </div>js 代码:
<script type="text/javascript">
 layui.use('upload', function(){
 var upload = layui.upload;
 var tag_token = $(".tag_token").val();
 //普通图片上传
 var uploadInst = upload.render({
  elem: '.btn_upload_img'
  ,type : 'images'
  ,exts: 'jpg|png|gif' //设置一些后缀,用于演示前端验证和后端的验证
  //,auto:false //选择图片后是否直接上传
  //,accept:'images' //上传文件类型
  ,url: 'upload.php'
  ,data:{'_token':tag_token}
  ,before: function(obj){
  //预读本地文件示例,不支持ie8
  obj.preview(function(index, file, result){
   $('.img-upload-view').attr('src', result); //图片链接(base64)
  });
  }
  ,done: function(res){
  //如果上传失败
  if(res.status == 1){
   return layer.msg('上传成功');
  }else{//上传成功
   layer.msg(res.message);
  }
  }
  ,error: function(){
  //演示失败状态,并实现重传
  return layer.msg('上传失败,请重新上传');
  }
 });
 });
</script>
⒊ 后端处理
因为前端 Layer 默认的是 POST 请求,则后台 uplaod.php 核心代码如下:
if ($_POST) {
 //上传图片具体操作
 $file_name = $_FILES['file']['name'];
 //$file_type = $_FILES["file"]["type"];
 $file_tmp = $_FILES["file"]["tmp_name"];
 $file_error = $_FILES["file"]["error"];
 $file_size = $_FILES["file"]["size"];
 if ($file_error > 0) { // 出错
 $message = $file_error;
 } elseif($file_size > 1048576) { // 文件太大了
 $message = "上传文件不能大于1MB";
 }else{
 $date = date('Ymd');
 $file_name_arr = explode('.', $file_name);
 $new_file_name = date('YmdHis') . '.' . $file_name_arr[1];
 $path = "upload/".$date."/";
 $file_path = $path . $new_file_name;
 if (file_exists($file_path)) {
  $message = "此文件已经存在啦";
 } else {
 //TODO 判断当前的目录是否存在,若不存在就新建一个!
 if (!is_dir($path)){mkdir($path,0777);}
  $upload_result = move_uploaded_file($file_tmp, $file_path);
  //此函数只支持 HTTP POST 上传的文件
  if ($upload_result) {
  $status = 1;
  $message = $file_path;
  } else {
  $message = "文件上传失败,请稍后再尝试";
  }
 }
 }
} else {
 $message = "参数错误";
}
return showMsg($status, $message);
【注意】: 使用下载的源码文件时,可将该处的核心代码进行替换 补充公共函数 showMsg() :function showMsg($status,$message = '',$data = array()){ $result = array( 'status' => $status, 'message' =>$message, 'data' =>$data ); exit(json_encode($result)); }⒋ 实现效果

♬ 补充
⒈ 注意事项 提供的代码,可用于 PHP 的原生开发或其他流行框架,其实只要后台能接收到 $_FILES 数据就好办了 我就是卡在了 Laravel 框架的 CSRF 认证上,耗费了好多时间,所以:
<!--如果使用的是Laravel框架,打开下面这句话!--> <!--<input type="hidden" name="_token" class="tag_token" value="<?php /*echo csrf_token(); */?>">-->后端代码的图片上传功能属于原生程序,可自行优化,建议使用流行框架所推荐的集成方法。 ⒉ move_uploaded_file() 补充
对于上述的代码,需要注意一点 : move_uploaded_file() 方法的使用
如果图片所上传的目录不存在,很可能会报错,所以需要判断当前情况,若不存在,要建立新目录
//TODO 判断当前的目录是否存在,若不存在就新建一个! if (!is_dir($path)){mkdir($path,0777);}⒊ Laravel 中的处理 作为 PHP 开发的流行框架,必然做了对文件上传功能的集成,文件的上传,可参考学习文档,以本人的处理为例:
⑴. 相对于使用默认的上传方法,会将文件存放到 "storage" 目录中,而进一步对该目录的访问还需要添加软链接,感觉有点麻烦,所以我指定磁盘到 "public" 目录即可
⑵. 可参考我之前的一篇文章—— Laravel 文件上传功能实现 ,打开配置文件 config/filesystems.php ,向磁盘配置数组中添加一个 url
'upload' => [ 'driver' => 'local', 'root' => public_path('upload/image/'.date('Ymd')), ],⑶. 相对应的后台核心处理代码则为:
public function img_file(Request $request) { $status = 0; $data = []; if ($request->method()== 'POST') { $date = date('Ymd'); $path = $request->file('file')->store('', 'upload'); if ($path){ $fileUrl = '/upload/image/'.$date.'/'.$path; $status = 1; $data['url'] = $fileUrl; $message = '上传成功'; }else{ $message = "上传失败"; } } else { $message = "参数错误"; } return showMsg($status, $message,$data); }如此一来,上传的图片所在目录为: public/upload/image/{$date}/
扫码二维码 获取免费视频学习资料

- 本文固定链接: http://phpxs.com/post/6682/
- 转载请注明:转载必须在正文中标注并保留原文链接
- 扫码: 扫上方二维码获取免费视频资料