


一、XDEBUG调试
这里我们需要用到php的 xdebug 拓展,所以需要小伙伴们自己去装一下,因为我这里用的是docker,所以就简单介绍下在docker中使用xdebug的注意点。
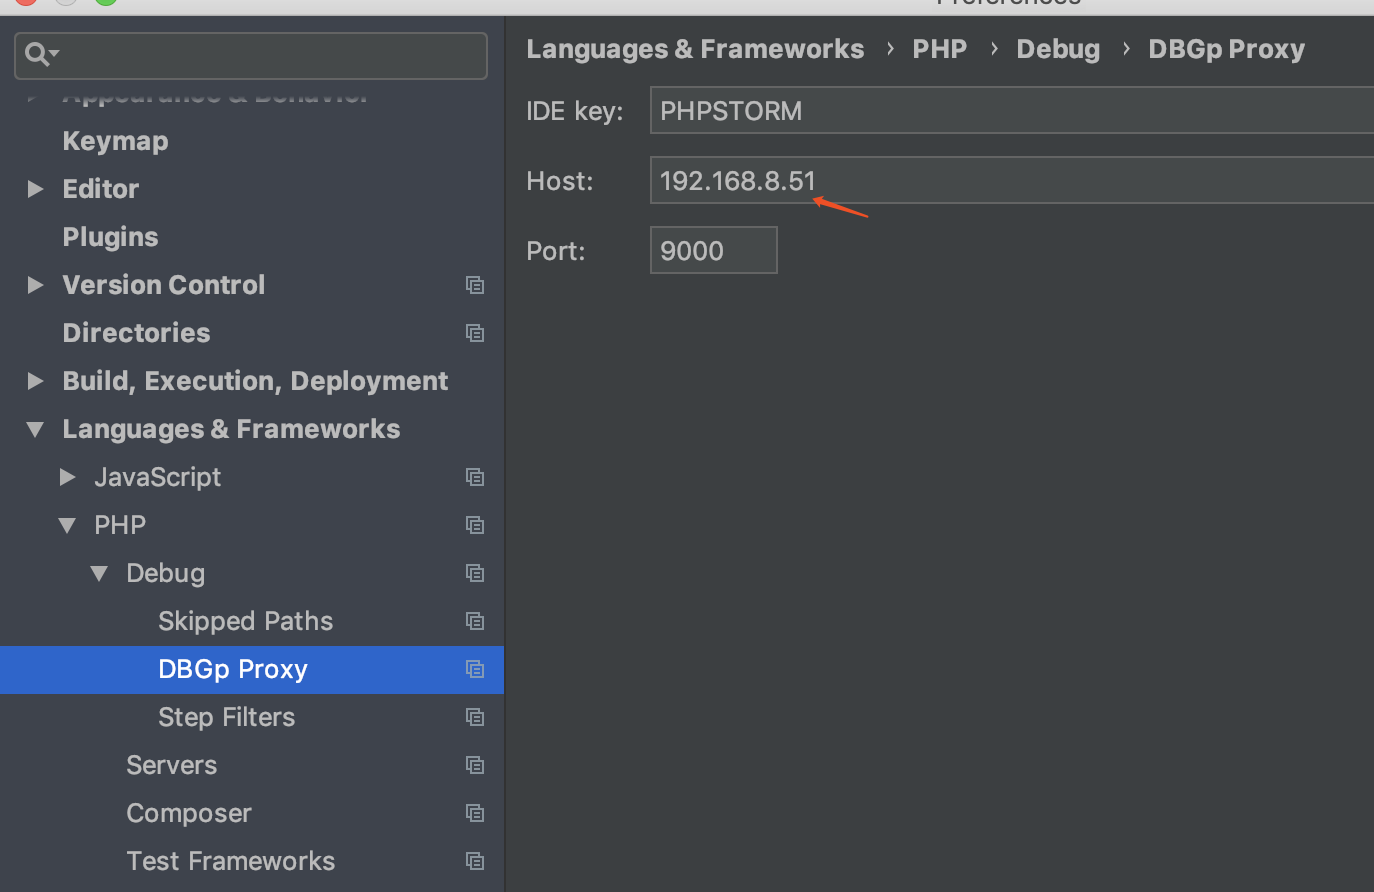
1、在phpstorm中的 Perferences >> Languages & Framework >> PHP >> debug >> DBGp Proxy 中的Host填写的是宿主机的IP地址。可以在命令行中使用ifconfig / ipconfig查看你的本地IP。
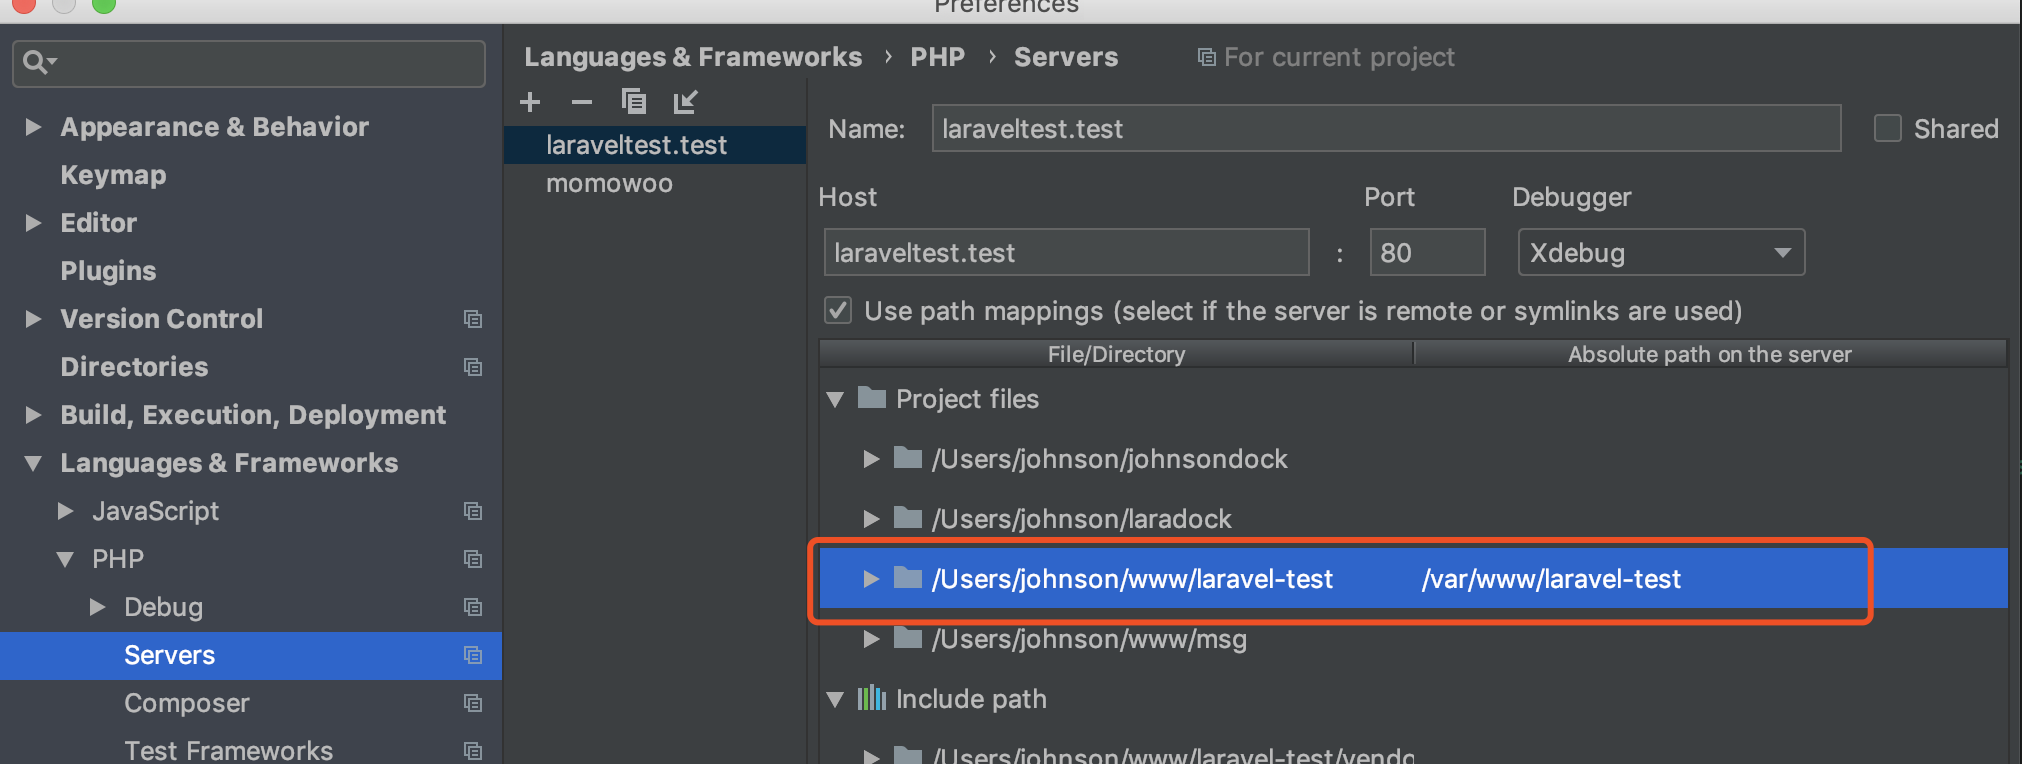
2、在 Perferences >> Languages & Framework >> PHP >> Servers 中将你本地项目地址映射到docker容器中的项目地址。
3、xdeug.ini的配置。需要特别注意的就是 xdebug.remote_host 填的也是你的宿主机ip。 xdebug.remote_connect_back 配置一定要关掉,否则 xdebug.remote_host 就会不起作用。
当xdebug启动后,效果是这样的
二、laravel生命周期
1、启动容器
我们知道Laravel所有的请求都会被nginx转发到项目下的 public/index.php 文件中。
<?php

/**

* Laravel - A PHP Framework For Web Artisans

*

* @package  Laravel

* @author   Taylor Otwell <taylor@laravel.com>

*/

define('LARAVEL_START', microtime(true));

/*

|--------------------------------------------------------------------------

| Register The Auto Loader

|--------------------------------------------------------------------------

|

| Composer provides a convenient, automatically generated class loader for

| our application. We just need to utilize it! We'll simply require it

| into the script here so that we don't have to worry about manual

| loading any of our classes later on. It feels great to relax.

|

*/

require __DIR__.'/../vendor/autoload.php';

/*

|--------------------------------------------------------------------------

| Turn On The Lights

|--------------------------------------------------------------------------

|

| We need to illuminate PHP development, so let us turn on the lights.

| This bootstraps the framework and gets it ready for use, then it

| will load up this application so that we can run it and send

| the responses back to the browser and delight our users.

|

*/

$app = require_once __DIR__.'/../bootstrap/app.php';

/*

|--------------------------------------------------------------------------

| Run The Application

|--------------------------------------------------------------------------

|

| Once we have the application, we can handle the incoming request

| through the kernel, and send the associated response back to

| the client's browser allowing them to enjoy the creative

| and wonderful application we have prepared for them.

|

*/

$kernel = $app->make(Illuminate\Contracts\Http\Kernel::class);

$response = $kernel->handle(

   $request = Illuminate\Http\Request::capture()

);

$response->send();

$kernel->terminate($request, $response);
很显然,第一件事就是 require __DIR__.'/../vendor/autoload.php' ,自动加载的加载。
核心 vendor/composer/ClassLoader 类中的 findFIle 方法
public function findFile($class)

   {

       // class map lookup

       if (isset($this->classMap[$class])) {

           return $this->classMap[$class];

       }

       if ($this->classMapAuthoritative || isset($this->missingClasses[$class])) {

           return false;

       }

       if (null !== $this->apcuPrefix) {

           $file = apcu_fetch($this->apcuPrefix.$class, $hit);

           if ($hit) {

               return $file;

           }

       }

       $file = $this->findFileWithExtension($class, '.php');

       // Search for Hack files if we are running on HHVM

       if (false === $file && defined('HHVM_VERSION')) {

           $file = $this->findFileWithExtension($class, '.hh');

       }

       if (null !== $this->apcuPrefix) {

           apcu_add($this->apcuPrefix.$class, $file);

       }

       if (false === $file) {

           // Remember that this class does not exist.

           $this->missingClasses[$class] = true;

       }

       return $file;

   }
当自动加载注册完后,就开始启动Laravel了,下面 $app = require_once __DIR__.'/../bootstrap/app.php' 就是返回一个App实例,我们看下这文件到底做了些啥。
<?php/*

|--------------------------------------------------------------------------

| Create The Application

|--------------------------------------------------------------------------

|

| The first thing we will do is create a new Laravel application instance

| which serves as the "glue" for all the components of Laravel, and is

| the IoC container for the system binding all of the various parts.

|

*/

$app = new Illuminate\Foundation\Application(

   realpath(__DIR__.'/../')

);

/*

|--------------------------------------------------------------------------

| Bind Important Interfaces

|--------------------------------------------------------------------------

|

| Next, we need to bind some important interfaces into the container so

| we will be able to resolve them when needed. The kernels serve the

| incoming requests to this application from both the web and CLI.

|

*/

$app->singleton(

   Illuminate\Contracts\Http\Kernel::class,

   App\Http\Kernel::class

);

$app->singleton(

   Illuminate\Contracts\Console\Kernel::class,

   App\Console\Kernel::class

);

$app->singleton(

   Illuminate\Contracts\Debug\ExceptionHandler::class,

   App\Exceptions\Handler::class

);

/*

|--------------------------------------------------------------------------

| Return The Application

|--------------------------------------------------------------------------

|

| This script returns the application instance. The instance is given to

| the calling script so we can separate the building of the instances

| from the actual running of the application and sending responses.

|

*/

return $app;
首先new出一个app实例,但在其构造函数中,做了一些框架的初始化工作。
public function __construct($basePath = null)

   {

       if ($basePath) {

           $this->setBasePath($basePath);

       }

       $this->registerBaseBindings();

       $this->registerBaseServiceProviders();

       $this->registerCoreContainerAliases();

   }
在 setBasePath 中,向Laravel容器中注入了下面这些路径。
protected function bindPathsInContainer()

   {

       $this->instance('path', $this->path());

       $this->instance('path.base', $this->basePath());

       $this->instance('path.lang', $this->langPath());

       $this->instance('path.config', $this->configPath());

       $this->instance('path.public', $this->publicPath());

       $this->instance('path.storage', $this->storagePath());

       $this->instance('path.database', $this->databasePath());

       $this->instance('path.resources', $this->resourcePath());

       $this->instance('path.bootstrap', $this->bootstrapPath());

   }
这也就是为什么我们在项目中可以使用 storage_path() 等方法获取路径的原因。
然后就是注册一些Laravel的基础绑定
protected function registerBaseBindings()

   {

       static::setInstance($this);

       $this->instance('app', $this);

       $this->instance(Container::class, $this);

       $this->instance(PackageManifest::class, new PackageManifest(

           new Filesystem, $this->basePath(), $this->getCachedPackagesPath()

       ));

   }
这里将app容器绑定到 app 和 Container::class 上,然后再绑定一个 PackageManifest::class 到容器中,这个类是在Laravel5.5后的新功能--包自动发现时用的。
然后注册了三个服务提供者,如果它们中有register方法,则执行其中的register方法。
   protected function registerBaseServiceProviders()

   {

       $this->register(new EventServiceProvider($this));

       $this->register(new LogServiceProvider($this));

       $this->register(new RoutingServiceProvider($this));

   }
至于它们的register方法都做了些啥,感兴趣的同学可以去看下源码。最后 registerCoreContainerAliases() 方法就是给大多类注册了一些别名/简称。
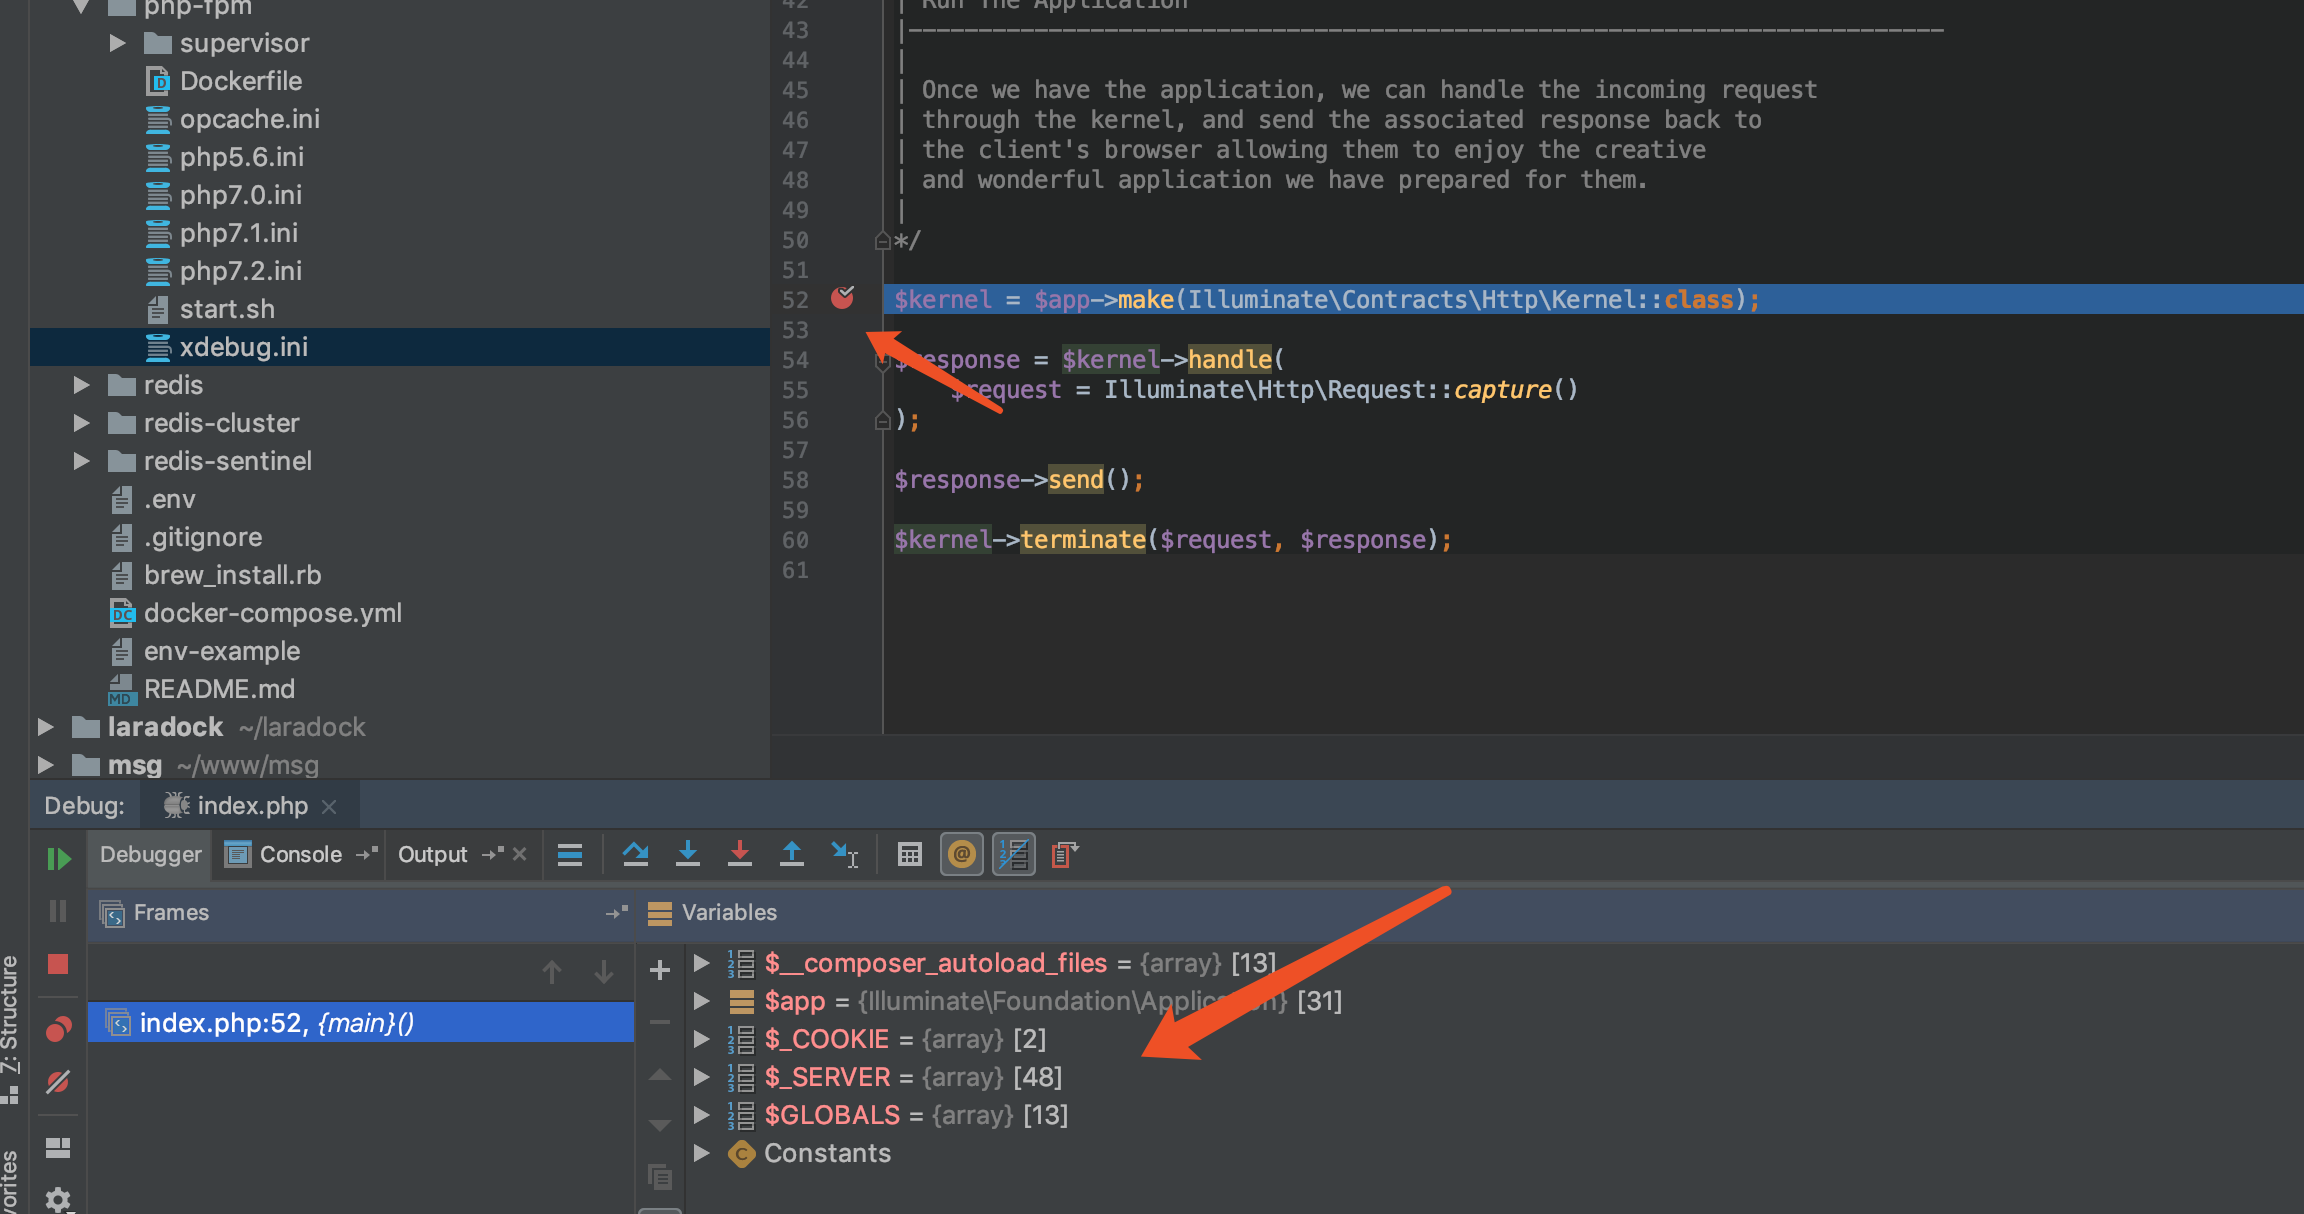
以上这些动作我们都可以通过xdebug来看到。让我们看下app实例中现在都有那些动作已经完成了。
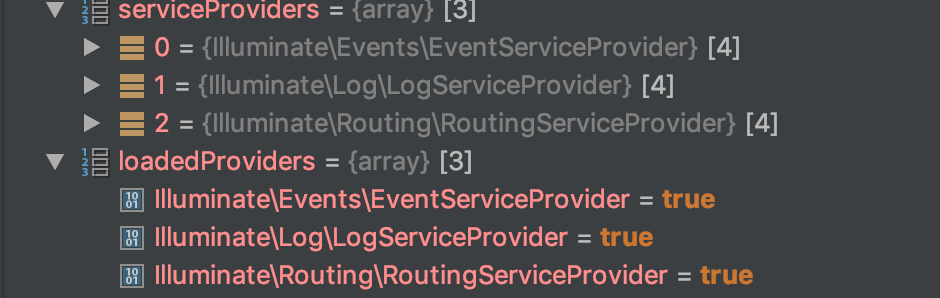
这是上面 registerBaseServiceProviders() 注册的三个服务提供者。
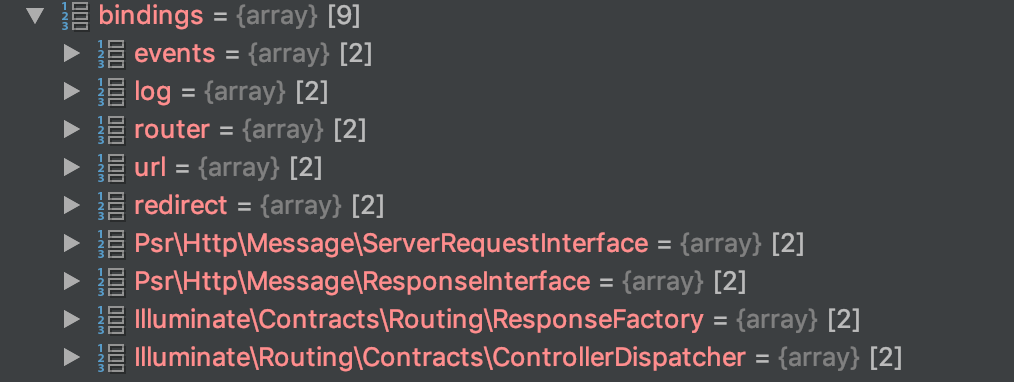
这个是上面注册的三个服务提供者里面register方法绑定到容器中的。
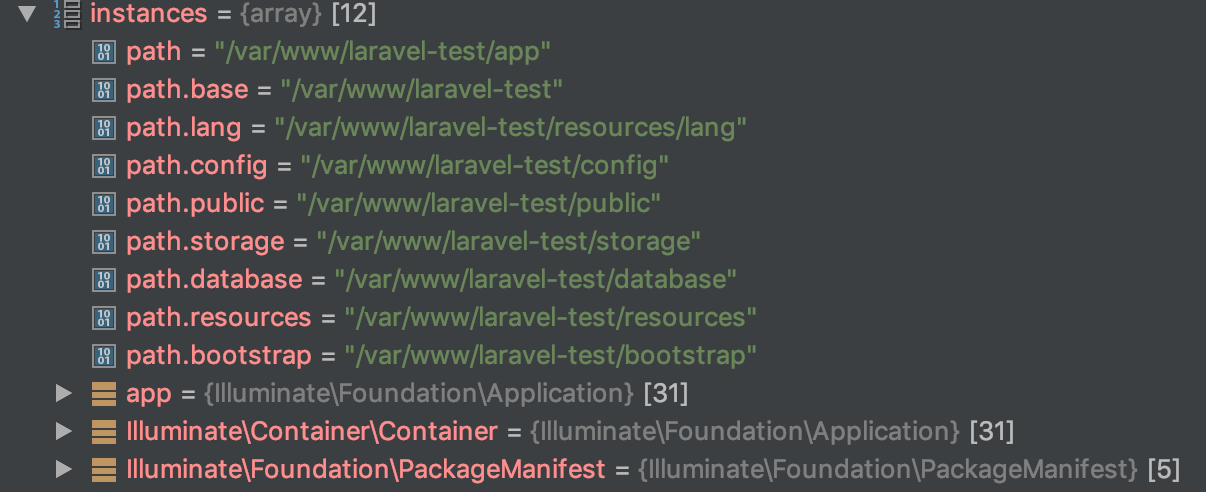
这是 registerBaseBindings 方法中绑定。

这两个属性是 registerCoreContainerAliases 方法中绑定的一些别名/简称。
然后连续三次调用 $app->singleton() ,分别将http,console和异常处理的实现类绑定到容器中。可以在app实例的bindings属性中看到
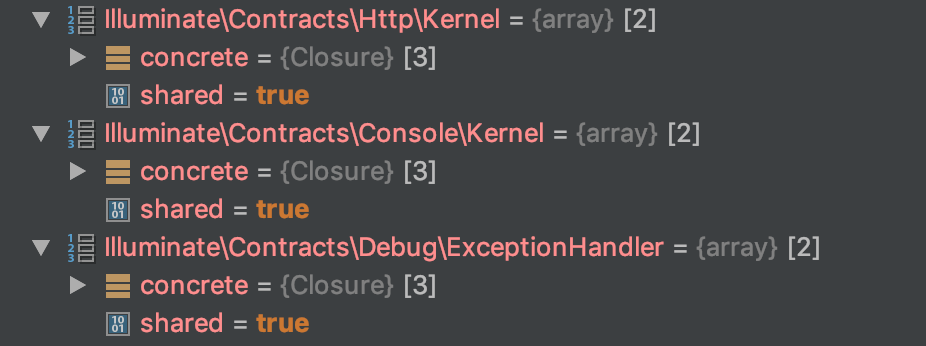
然后返回app实例,到此,这就是 bootstrap/app.php 文件做的所有事情。
我们知道Laravel的核心就是服务容器,在 bootstrap/app.php 文件中,我们向容器中绑定了很多服务,那么,我们想要服务该怎么从容器中取呢?
回到 public/index.php 中,紧接着 $kernel = $app->make(Illuminate\Contracts\Http\Kernel::class); ,就是从容器中取出 Illuminate\Contracts\Http\Kernel::class 类,此时,我们已经知道, Illuminate\Contracts\Http\Kernel::class 的实现类 App\Http\Kernel::class ,我们也可以在xdebug中看到。

这里试想下,如果不用服务容器,自己new一个App\Http\Kernel类出来,会发现里面有很多依赖,即使你最后new出来了,相比服务容器,那也太麻烦了。
服务容器是使用依赖注入和 ReflectionClass 反射类实现的。
App\Http\Kernel父类的构造方法中就是将App\Http\Kernel类中$middlewareGroups和$routeMiddleware数组中的中间件绑定到Route::class中。
2、分发路由
后面调用的 $response = $kernel->handle( $request = Illuminate\Http\Request::capture() ); 像一个大黑盒子一样,在里面完成了所有的路由分发,中间件检测等工作。
先看一下 $request = Illuminate\Http\Request::capture() 方法;首先是通过php的超全局变量创建一个SymfonyRequest,然后再将SymfonyRequest转换Laravel可用的 Illuminate\Http\Request ,并丢入 handle() 方法中。
 /**

    * Handle an incoming HTTP request.

    *

    * @param  \Illuminate\Http\Request  $request

    * @return \Illuminate\Http\Response

    */

   public function handle($request)

   {

       try {

           $request->enableHttpMethodParameterOverride();

           $response = $this->sendRequestThroughRouter($request);

       } catch (Exception $e) {

           $this->reportException($e);

           $response = $this->renderException($request, $e);

       } catch (Throwable $e) {

           $this->reportException($e = new FatalThrowableError($e));

           $response = $this->renderException($request, $e);

       }

       $this->app['events']->dispatch(

           new Events\RequestHandled($request, $response)

       );

       return $response;

   }
里面的核心就是 sendRequestThroughRouter() 方法,通过字面意思也可以知道是--通过路由发送请求。
   /**

    * Send the given request through the middleware / router.

    *

    * @param  \Illuminate\Http\Request  $request

    * @return \Illuminate\Http\Response

    */

   protected function sendRequestThroughRouter($request)

   {

       $this->app->instance('request', $request);

       Facade::clearResolvedInstance('request');

       $this->bootstrap();

       return (new Pipeline($this->app))

                   ->send($request)

                   ->through($this->app->shouldSkipMiddleware() ? [] : $this->middleware)

                   ->then($this->dispatchToRouter());

   }
$this->app->instance('request', $request); 和 Facade::clearResolvedInstance('request'); 分别表示绑定 Illuminate\Http\Request 到容器中和从Facade(目前并没有)中删除request。
$this->bootstrap(); 是将 Illuminate\Foundation\Http\Kernel 中的 $bootstrappers 数组
protected $bootstrappers = [

       \Illuminate\Foundation\Bootstrap\LoadEnvironmentVariables::class,

       \Illuminate\Foundation\Bootstrap\LoadConfiguration::class,

       \Illuminate\Foundation\Bootstrap\HandleExceptions::class,

       \Illuminate\Foundation\Bootstrap\RegisterFacades::class,

       \Illuminate\Foundation\Bootstrap\RegisterProviders::class,

       \Illuminate\Foundation\Bootstrap\BootProviders::class,

   ];
放到app容器中的 $this->app->bootstrapWith($this->bootstrappers()); 方法中一一执行。
public function bootstrapWith(array $bootstrappers)

   {

       $this->hasBeenBootstrapped = true;

       foreach ($bootstrappers as $bootstrapper) {

           $this['events']->fire('bootstrapping: '.$bootstrapper, [$this]);

           $this->make($bootstrapper)->bootstrap($this);

           $this['events']->fire('bootstrapped: '.$bootstrapper, [$this]);

       }

   }
该方法首先触发 'bootstrapping: '.$bootstrapper 事件,表明 $bootstrapper 正在执行。当执行完 $bootstrapper 中的 bootstrap() 的方法后,触发 'bootstrapped: '.$bootstrapper 时事件,表明 $bootstrapper 执行完毕。下面我们看下这个数组中到底做了什么。
1、 \Illuminate\Foundation\Bootstrap\LoadEnvironmentVariables::class, 很显然,就是加载.env文件中的配置到项目中,它这里放在三个地方。
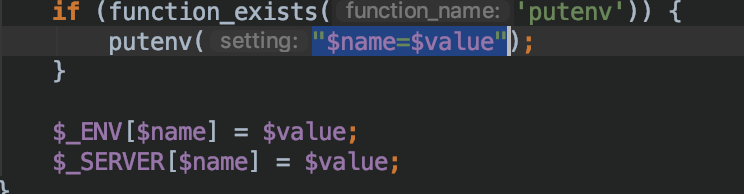
所以当我们想要获取.env中的配置文件时,可以使用getenv()、$_ENV或$_SERVER都可以。
2、 \Illuminate\Foundation\Bootstrap\LoadConfiguration::class, 同样的,这是加载config文件下的所有配置文件。并将这些配置存在 Illuminate\Config\Repository 类的 $items 中。
3、 \Illuminate\Foundation\Bootstrap\HandleExceptions::class, 加载异常处理类
4、 \Illuminate\Foundation\Bootstrap\RegisterFacades::class, 注册 config/app.php 中的 aliases 数组和 bootstrap/cache/packages.php 的所有门面。
5、 \Illuminate\Foundation\Bootstrap\RegisterProviders::class, 注册 config/app.php 中的 providers 和 bootstrap/cache/packages.php 中的所有服务提供者,并将即使加载的和延迟加载的分开。记住,注册服务提供者时,如果该服务提供者有 register() 方法,则执行。
6、 \Illuminate\Foundation\Bootstrap\BootProviders::class, 如果存在的话,则执行上一步中注册的所有服务提供者中的 boot() 方法。
执行完 bootstrap() 方法。Laravel所有的加载工作都完成了,后面就开始通过 Pipeline 分发路由了。
return (new Pipeline($this->app))

                   ->send($request)  // 设置需要分发的request

                   ->through($this->app->shouldSkipMiddleware() ? [] : $this->middleware)  // 设置request需要通过的中间件

                   ->then($this->dispatchToRouter());  // 开始通过中间件
重点就是在这个then()方法中。
   /**

    * Run the pipeline with a final destination callback.

    *

    * @param  \Closure  $destination

    * @return mixed

    */

   public function then(Closure $destination)

   {

       $pipeline = array_reduce(

           array_reverse($this->pipes), $this->carry(), $this->prepareDestination($destination)

       );

       return $pipeline($this->passable);

   }
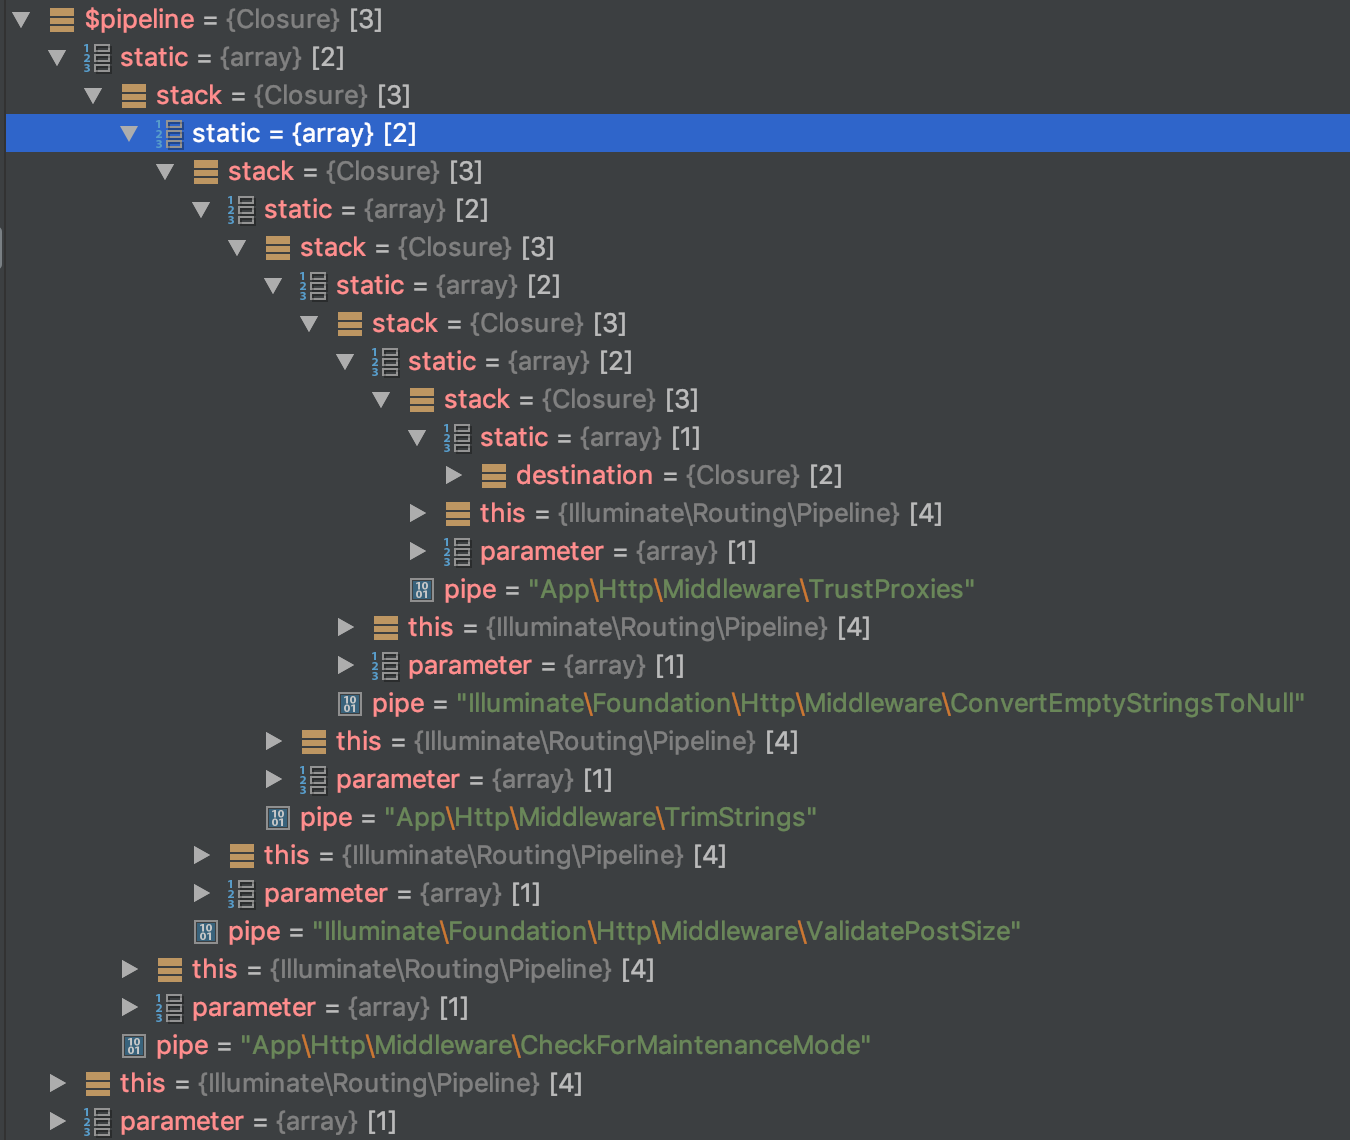
形象点,可以用包洋葱来理解这里到底做了些什么?
array_reduce() 里就是将 App\Http\Kernel 中 $middleware 数组倒过来,通过 $this->carry() 将 $this->prepareDestination($destination) 像包洋葱一样一层层包起来。
可以通过xdebug看下最终包好的洋葱的样子。
洋葱包完了,我们就该剥洋葱了。 return $pipeline($this->passable); 就是剥洋葱的整个动作。
具体怎么个剥法,可以在 carry() 方法中看到
   protected function carry()

   {

       return function ($stack, $pipe) {

           return function ($passable) use ($stack, $pipe) {

               if (is_callable($pipe)) {

                   // If the pipe is an instance of a Closure, we will just call it directly but

                   // otherwise we'll resolve the pipes out of the container and call it with

                   // the appropriate method and arguments, returning the results back out.

                   return $pipe($passable, $stack);

               } elseif (! is_object($pipe)) {

            // $pipe是中间件的类名所以会进入这里,parsePipeString方法是解析中间件有没有携带参数,如果没有则$parameters是一个空数组。

                   list($name, $parameters) = $this->parsePipeString($pipe);

                   // If the pipe is a string we will parse the string and resolve the class out

                   // of the dependency injection container. We can then build a callable and

                   // execute the pipe function giving in the parameters that are required.

                   $pipe = $this->getContainer()->make($name);    // 从容器中解析出中间件类


            // $passable就是request, $stack就是包洋葱时包进来的闭包

                   $parameters = array_merge([$passable, $stack], $parameters);

               } else {

                   // If the pipe is already an object we'll just make a callable and pass it to

                   // the pipe as-is. There is no need to do any extra parsing and formatting

                   // since the object we're given was already a fully instantiated object.

                   $parameters = [$passable, $stack];

               }

          // 如果中间件中有$this->method方法(其实就是handle方法),则传入$parameters参数,执行handle方法。

               $response = method_exists($pipe, $this->method)

                               ? $pipe->{$this->method}(...$parameters)

                               : $pipe(...$parameters);

               return $response instanceof Responsable

                           ? $response->toResponse($this->container->make(Request::class))

                           : $response;

           };

       };
一直到洋葱芯,其他外层都是中间件的处理,我们找其中一个看一下,例如 \App\Http\Middleware\CheckForMaintenanceMode::class, 的handle方法。
    /**

    * Handle an incoming request.

    *

    * @param  \Illuminate\Http\Request  $request

    * @param  \Closure  $next

    * @return mixed

    *

    * @throws \Symfony\Component\HttpKernel\Exception\HttpException

    */

   public function handle($request, Closure $next)

   {

     // 判断项目是否下线

       if ($this->app->isDownForMaintenance()) {

           $data = json_decode(file_get_contents($this->app->storagePath().'/framework/down'), true);

       // 验证IP白名单

           if (isset($data['allowed']) && IpUtils::checkIp($request->ip(), (array) $data['allowed'])) {

               return $next($request);

           }

       // 验证path是否在 $except 数组中

           if ($this->inExceptArray($request)) {

               return $next($request);

           }

           throw new MaintenanceModeException($data['time'], $data['retry'], $data['message']);

       }

     // 如果通过,则传request到闭包继续执行

       return $next($request);

   }
所有的中间件处理方式都是一样的,具体哪个中间件做了哪些操作,感兴趣的同学可以自己去看下源码,这里不详细赘述。下面我们直接看洋葱芯都做了些啥?
其实洋葱芯就是 dispatchToRouter() 方法中返回的一个闭包。
   /**

    * Get the route dispatcher callback.

    *

    * @return \Closure

    */

   protected function dispatchToRouter()

   {

       return function ($request) {

       // 向容器中放入实例request

           $this->app->instance('request', $request);

       // 通过\Illuminate\Routing\Router的dispatch方法分发request

       return $this->router->dispatch($request); };

   }
这个闭包里就是分发路由,然后再次像之前包洋葱和剥洋葱一样验证request中间件组里的中间件和路由配置里的中间件,最后执行控制器对应的方法。
至此Laravel整个生命周期就结束了。撒花
以上就是“从laravel源码分析其生命周期”的详细内容,想要了解更多laravel教程欢迎关注编程学习网
扫码二维码 获取免费视频学习资料

- 本文固定链接: http://phpxs.com/post/8210/
- 转载请注明:转载必须在正文中标注并保留原文链接
- 扫码: 扫上方二维码获取免费视频资料